Monday, January 31, 2011

Playroom Dreaming

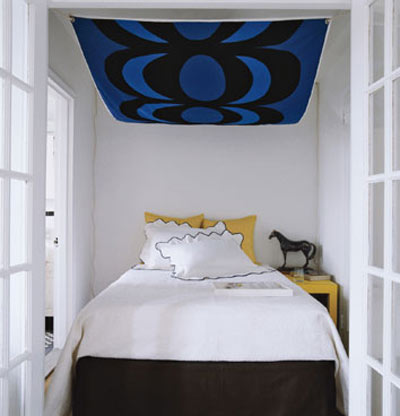
Do you have a room where furniture goes to die?  You know the routine, you buy new pieces for the important rooms and the furniture that you move out goes to other rooms that are less important.  Then the pieces from that space are either donated or sold b/c they have no home.  For me, the last stop before the curb is our playroom.

Several years ago I purchased a few pieces (very inexpensively) for our playroom and just never focused on pulling it all together.  The chairs are hold overs from my den, the sofa is ENORMOUS, but has a sleeper in it so we can have even more people spend the night with us!  It's upholstered in a blue twill, similar to the one below and is great for hiding stains.    There is also a pair of bookshelves (similar to these) in black for TV/storage.


These are all very basic pieces (I dare say blah).  But look what little fabric in the form of upholstery, pillows and window treatments could do for that space.

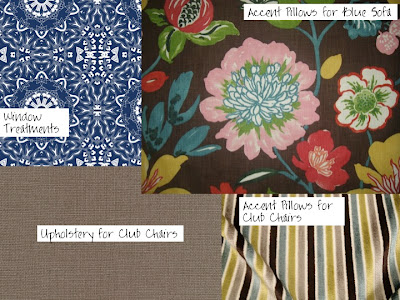
I have put together two different fabric plans and would love to know which of the two you like the best.  Maybe at some point this year, I will put one of these plans into action.  

Option 1


Option 2


For the striped accent pillows in the club chairs, I would create a design like this just to add interest.


So, which option is your favorite?  

Friday, January 28, 2011

New Addition to the Dining Room

A few months ago, I posted about this lamp (I actually wanted a pair of them) for my buffet in my dining room.  But for $790 plus shipping, I can think of so many other things I could buy.

Well, this week I was running errands and decided to duck into Home Goods just for quick look.  If you are a Home Goods' shopper, you know the trick to finding the good stuff, is to visit often and shop with a discerning eye (there's a lot of junk in there).  

And there, sitting quietly in the lamp section were these!  Without as much as a blink, they were in my car and on their way to their forever home (ok, forever is an exaggeration, but you get the idea)!!


I love the modern shape which adds some interest to my otherwise traditional dining room.  Still thinking about the shades.  I think I may add dark gray drum shades to them, but that does not have to happen right now.   It's hard to see in the picture, but they have a green/yellow metallic crackle finish.  They actually look great with the wall color/treatment (which I inherited from the previous owner and am living with for now) and the drapery panels which are a green raw silk.  


These were a sweet deal at only $49 each!   There were two others I loved and wanted (great price too), but I refrained.  I still need additional lamps, but what's the fun in buying them all at once?  You have to pace yourself.

There are still lots of things I would like to do to this space - I have a plan.  But I think a space is much more interesting when it evolves over time rather than all at once.  Next on the list for this room, new chairs.  But that will have to wait for another day!

Now, go enjoy your weekend.  M. 

Thursday, January 27, 2011

Ready for a Dinner Party?

Dining rooms can be difficult to pull off since they can easily become cold and sterile.  With fewer opportunities to use fabric, one must be clever in creating a cozy feeling in a dining room.  

These images are from the amazingly talented Jan Showers.  I love her ability to create a dining room with french flare coupled with that chic modern vibe. Not to mention a cozy feeling - Just yummy.  Makes me want to have a dinner party! 


Enjoy your day! M.


Wednesday, January 26, 2011

Find of the Day - Accent Chair

I could not believe this fabulous chair from Target.  I found it through an Amazon search [which has better prices on shipping than ordering straight from Target - it adds up people!] while sourcing chairs for a client. This is the Swoop chair and it's only $159.99!!! I mean come on, for that price, you could get one for the dog to sleep in and throw it away after it's trashed.  It comes in three colors and my personal favorite is the Pewter.

A pair of these would be wonderful flanking a fireplace for extra seating or as host and hostess chairs in your dining room.  The lines of this piece remind me of a cross between these two higher end versions. 

The Loring chair from Room and Board
 I have coveted this chair for several years now.  It also comes in Pewter velvet. 

$749.00 Each


And this beautiful accent chair from Plantation Design.  I adore the minky color of this velvet. 
Pricing Available Upon Request

I have a feeling this piece will not last long!! M.

Tuesday, January 25, 2011

Design Series Tuesday - Canopy Beds {part 4}

Well, this is our last installment of the canopy bed series.  I don't know about you, but it has certainly helped get me through January.  I have just started noticing the days are getting a little longer and it's not totally dark at 5:00. So, we are well on our way to Spring [Woo Hoo]. 

As for canopy beds, I have saved the best for last.  These are my favorite of all the canopy beds we have discussed.  I am calling this category . . .

Floating Fabric Canopy Beds 

These are examples of clever uses of fabric to accent the bed in unique ways.  I hope these are inspiring and allow you to come up with other ideas for your own bed.

Most of the floating fabric canopies require two drapery rods for installation - very simple.  But as you can see from the picture below, the fabrics you choose can add so much style.  Look at all the details on these - the fabrics, trim and tape.  Quite stunning (even in purple)!


This is a similar look, yet it is pulled out to the end of the bed.  Also, notice the sloping roof line.  This type of canopy is a wonderful solution for a sloping or even low ceiling.

This canopy reminds me of Greece.  The rest of the furnishings are quite rustic and almost country cottage, but the canopy itself is Santorini all the way!  

This one requires a bit less fabric since they did not carry it down behind the headboard. 

Another sloped roof.  I love the contrast of the unfinished ceiling and the white lace.  Reminds me of a room Jane Austen would write about.

I think this is a clever way to designate this very small area as the bedroom.  The striking graphics of the fabric really define the space.

Other Canopy Bed Ideas

This group is all the leftover photographs I pulled for this series.  Most of these are bed crowns or other types of pelmets to accent the bed.  Your imagination is the only limit with draping fabric above your bed.  Cute dog!

I am sure this is a staged vignette, but it feels like they have crammed way too much furniture into this small space. 

If you can't be a Queen, at least you can sleep like one.  [Not for me folks].

I actually like this one.  I think it's the green (which is my favorite color) and the fact that it looks like velvet.  All that texture makes me like it. 

As I continue to mention, I'm not crazy about the purple, but I do like the dark wood and how it contrasts with the light ceiling.

Would love your thoughts on this one!
Here's a close up of a bed crown.
My favorite part about this one is the shape of the headboard (so sweet in a little girl's room) - the rest is just too busy for my taste.  A

This is a simple version of the bed crown.  As an aside, I think it would be great to have a room large enough for a pair of full or even queen sized beds!

This one is really more of a sheer netting used in tropical places rather than a canopy, but I included it anyway. 

Lastly, another alternative to consider when you have a sloping roof line.  

Well, there you have it.  I have officially reached my saturation point with canopy beds.  Maybe if I did this with other things, I would actually save a little a money! 

PS: I also wanted to give a shout out of thanks to Emily at Splendid Market for awarding me the Stylish Blog.  It is the highest compliment when other bloggers recognize your efforts!  For a list of seven things about me, click here.  As for Splendid Market,  Emily's blog has been a favorite of my for a while.  Please check out her blog either by clicking here or going to my blogroll.   Thanks Emily! M.

Monday, January 24, 2011

Tools of the Trade - Hanging a Grouping


I wanted to share with you some tips on how to hang a series of artwork.  It is relatively easy to do if you have the right tools and a person who can hold the artwork so you can step back to make sure the spacing works.

But, what if you are hanging it by yourself?

Add to this the fact that many groupings include artwork with different hanging mechanisms on the back, different wire lengths, or side latches and no wire - all of which effect the height of a piece.  It can be a major chore.

This is a grouping in my dining room.
These plates were my Mom's first china pattern when she and my Dad were married 46 years ago.  Their house was struck by lighting and burned in 1999.  These plates were no longer usable (up close they are cracked throughout and stained in spots), so I made art out of them. (sorry for the dark photos, I realize I'm always apologizing for my photo skills, so maybe I need to treat myself to a class or two.)  

I hung this series by myself (yes, just me) on a Sunday afternoon a few years ago.  Here is the easiest way to hang art when you don't have a friend to help.

1. Figure out the proper layout of the series.  Always place the entire grouping on the floor to create the ideal placement. 
2. Grab some leftover over newspaper and trace each plate or picture onto the paper and cut them out.
3. Gently tape these cutouts to the wall and step back to make sure you are happy with the spacing and the height of the entire group.

4.  Once you are completely satisfied with the placement on the wall, you can begin hanging the plates.  
5. Start with the bottom piece first and place it on top of the paper cutout.  At this stage, I used this tool to get the exact placement of the nail.  I got it for Christmas one year, and now I simply cannot live without it!

 6.  You simply hang the picture (or plate in my case) on the hook at the bottom of the tool and hold it up to the wall on top of your paper cutout.  
7.  When it is completely lined up with the cutout, gently push on the picture/plate and the tool makes a small impression on the wall indicating where to place the nail.  It truly is a snap!  
8.  Once the nail is in place, you can remove the paper cutout.

 I like to remove all previously hung pieces while I'm hammering.  I have a tendency to bang so hard that I've knocked pieces off the wall!  So, I'm careful to make sure to place the exact plate back in it's original place (since the hangers on the back can vary slightly from piece to piece thus changing the spacing of the series).

One More Tip: I didn't know about this product when I hung my plates, but discovered it later and have used it for many projects since.  I love that it allows the plate to sit closer to the wall for a cleaner look.
Hopefully, this has inspired you to come up with a grouping of your own.
I hope your Monday runs super smooth! M.

Friday, January 21, 2011

Please Come Home!

Dear Summer,
I am writing in hopes that I can persuade you to come home earlier than you initially planned on being here.  I know you are very busy and have lots to do where you are, but we really need you here at home.

First, I feel like I owe you an apology.  I know at the end of your last visit, I seemed distant and preoccupied with the coming of Winter, but I promise I will not do that to you again!
Speaking of Winter, he has been very unpredictable during his visit with us.  One minute he is in a crisp cool mood and the next he is a blustery fool!  I hate to complain about him like this to you, but I know you completely understand what I am dealing with.  I wish you could come for at least a few days next month, just to calm him down a bit.  

We miss you so much.
  
Even the children are starting to ask about you.  It's just not the same without you here. 
  All those late afternoons that turned into early evening just sitting outside relaxing and enjoying each other's company.
I know I don't appreciate you like I should, but all that's changed.  I am more than ready this time for your arrival.  
If you come home, I promise not to neglect you for a single minute.  We could have so much fun together.  
We could plant some of those geraniums you love so much, or maybe go for some ice cream.  Maybe a a swim.  Heck, I'd even be willing to man a lemonade stand on the block, if you would just come on home.   
I know this is going to sound crazy, but even the food tastes bland and unappealing without you here - tomatoes, corn, herbs  - they just aren't the same. 
Think about it.  Will you?  
I'll wait to receive word be way of your friend, Phil.  Until then, please try and stay warm!
[photos via Decorpad


If you have time for a party this weekend, come on over.  I am participating in the following Link Parties! 
http://decormamma.blogspot.com/
http://romantichome.blogspot.com/
http://www.theshabbychiccottage.net/2011/01/quick-change.html
http://shabbynest.blogspot.com/2011/01/frugal-friday_20.html
http://frenchcountrycottage.blogspot.com/2011/01/feathered-nest-friday-no-18.html