Friday, November 23, 2012

Christmas Stocking Tutorial

Earlier this week, I promised to share with you how I made our Christmas stocking last year.  It was a fun affordable way to get a custom look.  I hope you try it for your own home! 
image via Mandi Smith T Interiors

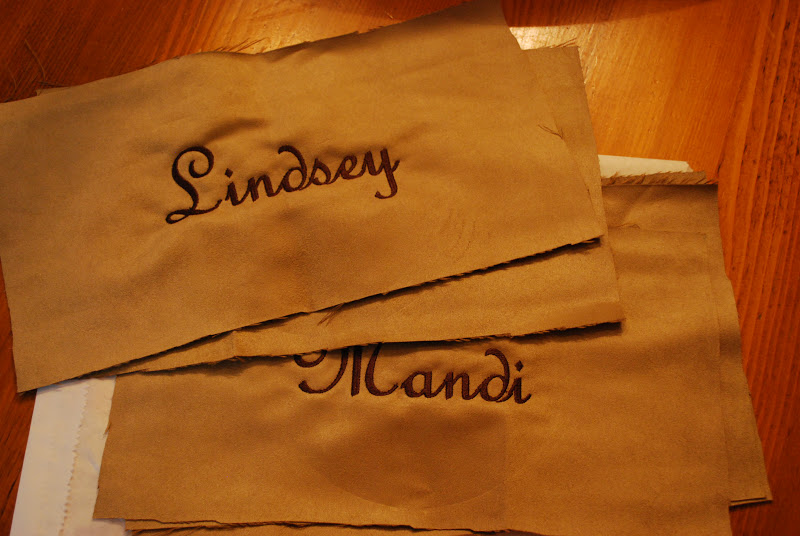
Step One: I took some leftover suede fabric (I used it to make lumbar pillows for chairs in my family room), and had it monogrammed with our names.  I chose chocolate for the lettering just to keep it neutral.  For those local, I had these done at Smith's Variety.
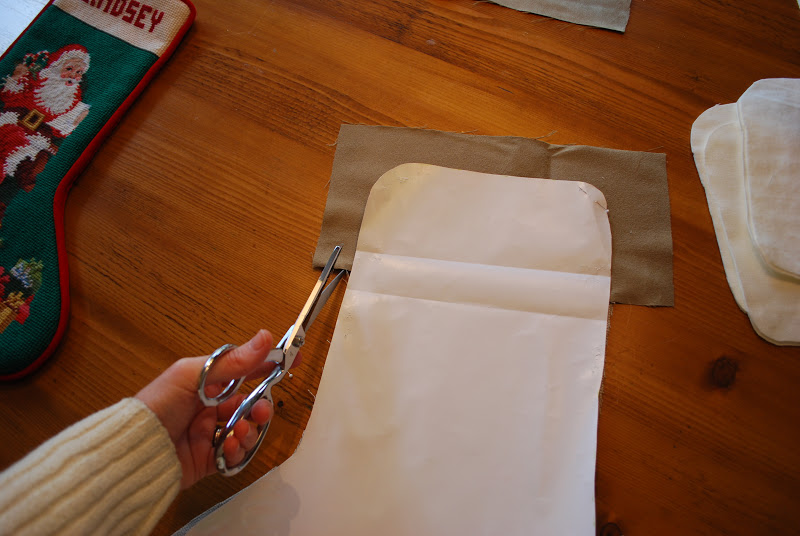
Using one of our stockings from the previous year, I created a pattern from leftover wrapping paper (see all that red in that paper - told you!).

Using the pattern, I cut out one linen "back" for the stocking.

Then I folded down the header of the pattern and cut out one linen "front" for the stocking.  If you want to make this easier, you can simply cut out two linen pieces of the same size and simply overlay the monogramming on top of it.

Then using a liner fabric (I used a thick cream cotton), cut out two liner stockings.  These will be inside the stocking and help to finish all the edges nicely.

Once you get your monogramming complete - with same sides together, sew the bottom of the monogrammed piece to the top of the front linen stocking.

It will look like this (and yes, I did make one for our cute dog, Lottie).

Then using a wide satin ribbon, pin it to the stocking (making sure to center it on the seam you just created).

Then top stitch the ribbon to the stocking on both edges.

Place your pattern on top of what you have sewn so far and trim off any excess fabric.
You now have the finished front of the stocking.  It will look like this.  Just an aside, it would have made the sewing so much easier if I had not rounded the top of the stocking.  A straight line across the top and down the sides would have been much, much easier.

Now it's time to attach the liner to the linen pieces.  Place one liner piece on top of your finished front.

Also place a liner piece on top of your linen back stocking piece and pin these together at the tops only.   Once pinned you will sew these together just at the tops on both pieces (this is where it would have been easier had it been a straight seam.  Then you will open them up to reveal this seam.

Both front and back will look like the picture below.  Now it's time to sew the two long pieces to each other along the sides.  I the image below I have sandwiched the pieces together.  The bottom piece is the liner and back linen (sewn together at the tops) and the top piece is the liner and front linen piece sewn together at the top.  So, to be clear as mud, the liners are matched up on the left and the stocking pieces are matched up on the right (with right sides together).   You will pin these two long pieces together all the way around with the exception of the bottom of the two liner pieces.

Here's a close up of the one place where you will not sew them together.

Once sewn together, you will reach into the opening and pull the stocking out so that the right (or correct) sides are showing.  Much like "righting" a sock before throwing it into the wash (that never happens around here!! Ha!).

Here's a picture of me reaching inside to "right" the stocking.

I took several pictures of this because it is one of my favorite parts about sewing.  I always think - Wow, It worked!

Once you've pulled this stocking through, all you need to do to finish it is whip stitch the opening in the liner closed.  Remember this does not have to be pretty because it will be buried inside the stocking.

Now, last step!  You need a loop to allow you to hook the stocking onto the mantle.  Rather than making this hard, I decided to use leather string.  I think it adds some interesting texture too.

I cut even lengths of leather (so that all the stockings would hang at the same level), and I tied a decorative knot on both ends of each piece.

Then, using a sewing marker (which disappears when you wet it), I made two even marks on each stocking where I wanted to sew the leather strips.

You could do this part by hand, but I'm lazy and wanted to use the machine.  So to do this, you will need to select a zig zag stitch on your machine and drop your feed dogs (which will prevent the fabric from moving), and stitch back and forth in one single spot over the leather end.  You will do this for each of the two knots on the stocking.

If you look closely you can see where I did this.  I used the clear monofilament thread to make it less noticeable in the finished product.

Here are all five (including Lottie!) finished stockings.

And here is how it will hang from the leather strips.

I know this sounds like a lot of steps.  But once you get one under your belt, you can easily get the others finished.  M.
  

Thursday, November 22, 2012

Turkey Day

Be thankful.
For all that you have. M.

Monday, November 19, 2012

Deconstructing the Cover

Hope everybody had a marvelous weekend!  The whirlwind is almost upon us.  Deep breaths.  I'm really hoping this early Thanksgiving will make things a bit less stressful for everyone.  Remember, we have a whole week afterwards before the month of December!!

So, today, I'm deconstructing the cover of Birmingham Home and Garden.  Most of you know my house made the cover of  the December issue of Birmingham Home and Garden (jumping for joy inside!!!).

If you didn't know, you've not been reading my blog.  Honestly, I've been talking about it incessantly.  It could be worse - be glad you're not my husband (poor thing, he's now resorted to just nodding and smiling when the conversation naturally flows back to this topic)!  In all seriousness, with the subscriptions delivered, I'm getting lots of great questions about the space.  So, I thought I would answer them here on the blog for everyone!

Artwork
First, the wonderful artwork over my mantel was done by a very talented artist from Mobile, Alabama, Ashley Terrell.  I simply adore her!  I got to know Ashley through a close friend/client who hosted a house show highlighting her work.  Here's the very first post I did on Ashley's artwork.  Here are a few of her most recent offerings. . . 
Ashley's work has been featured in lots of galleries as well as one of my favorite shops in all of NOLA - Shaun Smith Home.   My favorite things about Ashley - Her work will add a refreshing modern feel to any space.  But it is done in such a way that it blends beautifully with traditional furnishings.  That is a tall order!  If you've ever tried to blend modern artwork in a very traditional space, you know exactly what I'm talking about here.   Secondly, her work is affordable (sshhh, don't tell), but you would never know it!  If, like most people, your home is filled with tiny treasures, now's the time for a statement piece.  Contact Ashley.  You will not be disappointed. 
Overall Color Scheme
It was harder than I thought!  I made this snap decision right after Christmas the year before to take out all the red decorations in our home.
image via Mandi Smith T Interiors

 During the Christmas holidays of 2010, I was looking at a magazine of a gorgeous tree with no red and thought, I'm totally doing that next year.  I did not think about all the things this affects - the stockings, tree skirt, ornaments, even down to my wrapping paper.
image via Mandi Smith T Interiors

Completely changing the color scheme of your Christmas decorations is truly like changing the color scheme of your room.  It's a huge undertaking.  I loved the results and will be doing it again this year (now that I have the decorations).  But you need to really think about it before jumping in!
image via Mandi Smith T Interiors

The Tree
The most important thing about selecting the perfect fresh tree is to get the biggest one your space pocketbook will allow and make sure it has a straight trunk.  The fatter the tree, the better it will look (trust me on this).  Measure your space.  If you show up at the Christmas tree lot without a measuring tape, I'm calling you out as a rookie!  Also, if the trunk of the tree is in the least bit crooked, it will not be straight in the stand, and your results will not be the same.  

My favorite tree for decorating is the Fraser Fir - it has soft needles (so no sticking you when your covering it in lights), and it will stand up to heavy ornaments.   With that said, I also love the look of what I call a Charlie Brown Christmas tree.  We have some dear friends who always include one in their dining room.  It is so beautiful and (believe it or not) elegant with the bare limbs and all their gorgeous ornaments.   Sort of like this one, but on a much larger scale . . . (you can see the trunk the entire length of the tree).

As for lights, whether you do white or colored lights, buy twice as many as you think you'll need (yes, double).  I start with a thick layer on the inside of the tree first.  Then, I do the lights on the outside of the tree.  For both layers, I work in "pie shaped vertical" sections from top to bottom (not around and around).  This will make the "de-decorating process" so much easier.   Last tip here, every time I add a strand of lights, I step back and squint my eyes and look at the tree.  With this trick, you will instantly see the dark spots where you need to add more lights.  It's tedious.  Christmas music really helps!!

Last year, my son helped me with the lights; and I really don't think I could have done it without him.  Hoping he's in the mood to do it again this year! 

  One of the biggest questions I've been getting is "Where did I get my ornaments?"  After Christmas I shopped all the higher end places in town, including florists for those mega %75 off sales.  Then, at the beginning of the next Christmas season, I went to Walmart (yes, I did!) and snagged all the new great ornaments I could find (mainly white snowflakes, angels and reindeer).  I was very picky about which ones I purchased.  When you blend these in with other more expensive ornaments, they too begin to look more expensive.

For the ribbon, I did not skimp here.  I used high end ribbon in three different textures and widths - double sided satin in green, double sided satin/organza in gold, and a super wide burlap in chocolate.  Again, this will make the entire tree look more expensive.   

The Stockings
I'm saving this topic for now.  I will be posting a tutorial on how to make the stockings later this week.  So, stay tuned.

Clove Oranges
This was a fun, sweet project I did with my daughter.  Each year, my husband buys a case of oranges from a friend who sells them as a fundraiser.  They arrive just in time for Christmas.
image via Mandi Smith T Interiors

  I make lots of fresh orange juice with them.  We use them in orange things (click here for an explanation).  I cut sections and put them in salads and steep slices with other spices on the stovetop.  And we clove a few (there are a ton of them, so you have to be creative).  This is a fun thing for small children to do with you.   I buy a large jar of whole cloves, and a box of toothpicks.  Then use the toothpicks to create a pattern on the orange (this makes it easier to insert the cloves too).  Once the pattern is complete, fill in with the cloves.  It makes the room smell wonderful!  

Paper Whites
Sorry I don't have a close up picture of the paper whites.  Several people have asked me where I got them and about the container they're in.  Narcissus or paper whites are a quintessential flower in our house at Christmas.  They have the most wonderful honey fragrance that mingles with the evergreen that is unmatched by any candle!  The other great thing about these - they go with any color scheme you select for Christmas.  You can start your own now from bulbs or cheat a bit and buy them already blooming from your florist - locally I love Davis Wholesale.  I confess, I bought them blooming and tucked them into a rustic wooden container I've had for years.  I think I got it at Home Goods at some point for under $30 dollars.


Photo Shoot Process/Photographer
All the images for the magazine were taken by the talented Jean Allsopp.  She is a dream to work with on projects.  Although she has an amazing eye for the perfect angle and lighting for the shot, she is so down to earth and fun!  No stuffy photographer here.  This picture truly captures her personality!
via
All images of my home in this post (except the cover shot) were taken by me after the photo shoot and simply do not do Jean's images justice.  Although my home was featured on the cover, there is an entire article highlighting a home I decorated for a client for the holidays.  A big thanks to the Agnews for allowing us to photograph it, and a big thanks to Birmingham Home and Garden for featuring it.  The article includes lots of images from the Agnew's home with how to steps on recreating these decorations in your own home - completely different from what I've shared here.  So, you need to buy the magazine to see them! M.


Saturday, November 17, 2012

Find of the Day - Pimlico Magazine

Happy Weekend!  I thought I'd give you one more reason to relax this weekend.  My friend and fellow blogger Autumn Clemmons of Design Dump is being featured in the current holiday issue of Pimlico magazine. 


Design Dump is one of my "morning coffee" blogs.  Autumn is always able to find something amazing in places you'd never think to source!  Now her talent is being featured in a fresh new online magazine called Pimlico.  

Autumn has created a super chic table scape, along with some other very talents ladies, to give you ideas on how to decorate your table for the holidays.  After reading it, I wheels are definitely turning.  What I love about Autumn's table are all the jewels tones she included which is a design trend prediction for 2013. 
  
If you have time this weekend, I encourage you to click over and enjoy this free (yes, I said free) online magazine.  I loved it so much, I've included it in my online magazines list on my right side bar so you can go back again and again to enjoy it!  M.

Friday, November 16, 2012

Coming Clean

While I love to talk about interior design, one question I get a lot is "What do you recommend for removing stains?"  And let's face it, although the holidays are filled with wonderful, joyful moments, there are plenty of opportunities especially during the next 60 days for stains to happen.

And maybe just anytime of year!  This image totally cracks me up.

But with a little knowledge and a few products on hand, you can sail through any mishaps.  Remember, it's not "if" but "when" with stains.  The goal - to be ready to attack an accident like an ninja on a mission and not let it ruin your party!


To figure out what to use on the stain you have to consider two things: 1) the rug material and 2) the kind of stain.  Without considering this you will be doing more harm than good when attempting to clean it.  In fact, some of the stain removers will become part of the stain if not selected thoughtfully.

Hands down, the best rug material for stain removal is wool.  It is one of the most expensive rug materials for a reason.  So, when you are considering a rug for a high traffic area, it may be counter intuitive, but the more expensive wool will be easier to clean and last longer.


OK, so let's say you didn't select wool, your next best effort for getting the stain out is to consider the stain itself.  Here is a great chart that outlines what to use on different kinds of stains.  Yes, this chart is long and boring, but when you need it, it is invaluable.  So, bookmark it now and refer to it before touching that stain with any product!

Spot Removal Chart

Now, I want to highlight just a few products you need to stock up on in preparation for the holiday stains season.  Remember, the chart alone, is not going to save you if you don't have the products on hand.  Consider this a life preserver - you hope you never need to use it; but if you do, it's there.

So, here are a few tried and true products.    

Capture
This is an excellent dry powder cleaner.  One of my vendors told me about this product, and he was right!  You can also leave it on the spot overnight, if it's a super tough stain.  It will even remove an old stain (as in two years old).  The biggest negative with this product is it's a super fine white powder (think baby powder) which makes it difficult to completely remove when you're finished cleaning the spot.  If you're not careful, it can even clog the vacuum cleaner!  Also, it's white, so if your rug is dark, you may want to consider one of the others in my arsenal.

Host
I just discovered this product from a very savvy client of mine.  She is on top of everything, and I learn lots of things from our visits!  After she told me about this product, I started noticing lots of sisal rug websites mention it by name on the "spot removal" page.  So, that speaks volumes.  It is also endorsed by Martha (which again, enough said).  

It is a dry fine textured powder (like Capture), but what I like about it is that it's not white.  

It is the color of a natural sisal rug!  So, if you aren't able to remove every last bit of it, you will never notice.  They also make a pre-stain spray you can use on your sisal when it first arrives - sort of like the spray guard you use on suede boots.  I've not tried this product, so if any of you have, I would love to hear from you.  

Distilled Turpentine
I am including this one on the list, because it is great for removing tar, chewing gum and any oil based foods like cream, gravies and sauces.  Also, it's not a product I ordinarily have hanging around in my pantry.  So, stock up on it now.


Spot Shot
Most of the pros do not recommend a liquid spot remover.  Which is interesting since most spot removers you see in stores are a liquid.  The biggest problem with a liquid is that it wets the spot even more and makes it difficult for you to tell if you've completely removed the stain.   Then, you have to wait for the spot to dry.  After it dries, it becomes "set in" and even more difficult to clean.  With that said, there is one liquid remover I love and do use.  I have had great results with this product on carpet for pet vomit (yes, there, I said it).  It happens, what can I say!  One too many treats and WHAM - always on a rug.   

Wine Away
Now, I've really focused on carpets and rugs, but I do love this product which can be used on furniture as well.  Believe me, if you have light colored furniture, you need Wine Away.  When the spill happens you simply spray this on and it magically disappears (really). 

So, there you have it.  Those are my favorites for keeping your spaces beautiful.  With a little pre-planning, you too can entertain without worrying about spills!  Happy Weekend, everybody! M.