Showing posts with label DIY. Show all posts

Wednesday, June 27, 2012

Thinking About a Little DIY

Noticing a lot of chatter lately about the hot summer trend of all things nautical - which is so fun for summer.  Here is one great piece I've had my eye on . . . 

I think it is so chic and would add just the right amount of sparkle to my coffee table.  But, I can't justify $185.00 for a trendy accessory.  I know, it's really great.  Isn't it? 

So, I was thinking (my husband says he dreads that phase more than anything in the world) . . . What if I took this shell (at $24.95).

or this one at $25.00 (it's resin). 

And painted the interior gold (since brass/gold accents are still hotter than hot).  There are so many options for how to add the gold accent.  You could do gold leaf which would add a lot of texture to the inside. 


or craft paint - this one feels aged to me which is a great thing . . . 

or even a little metal (anything called liquid metal, I'm in!) . . .

You've got yourself a nautical/gold chachkie for a fraction of the price!  With a deal like that, I really wouldn't feel bad moving on when the trend is over.  M.

Wednesday, June 6, 2012

Sea Fans - Tutorial


As promised, here are the steps for framing the sea fans.  I started with fans.  If you would like some of your very own click here.  Then, I picked up two square shadow box Ribba frames in white from IKEA.  Yes, I said IKEA.  I already had the linen, but you can pick up a yard or so from any fabric store.  In addition to these supplies, you will also need: scissors, exacto knife (box cutter), self adhesive fabric spray, a staple gun, monofilament thread, a needle, a drill, four popsicle sticks (just wait, I'll explain) and thick brown all purpose paper.

Step One
Measure your sea fans and determine the best placement of them in your frame.  Mark this spot on the backing board (which is provided with the Ribba frame).

Using your drill, make a small hole going all the way through the backing board.  You will also want to make a second hole in the backing board at the point where the base or root of the sea fan will rest.    

Step Two
Measure and cut your linen one inch larger than the backing board all the way around.


Step Three
This is very important (I did not do this on the first one and had to go back and redo it).  Secure the brackets and hanging wire onto the backing board (using the instructions provided with the IKEA frame).  

Step Four
Spray the backing board with the self adhesive spray and cover with the linen.  This will cover the fronts of the hanging brackets so they are not see in the final product.  


Step Five
Flip the board over and re-enforce with staples to secure the linen to the board.  This will prevent the fabric from drooping from the weight of the sea fans in the final product.


Step Six
Using the needle and monofilament thread, push the needle through the back and around the sea fan to secure it to the board.

You are basically sewing the sea fan to the linen.

 I looped it through the backing board and around the sea fans three times.  I did this for for the top and bottom holes I drilled in the backing.

Step Seven
Once you have loop it through several times, place a popsicle stick over the drilled hole on the back and tie off the thread securing the popsicle stick.  This will act as a support for the sea fan and prevent it from drooping in the final product. 

Step Eight
Remove the mat provided with the frame (you will not need it for this project) and place the backing board in place in the frame and bend the dark metal braces back in place to secure the backing into the frame. 

Step Nine 
Using thick brown paper and double stick tape, finish off the backs of the frames for a professional look. 

And that is it!  I know it sounds like a lot of steps, but they are all very easy.  It took me about 20 minutes start to finish.  No waiting around for glue to dry like with the intaglio project!  

Now, it's your turn.  I would love to see pictures of your finished project.  M.

Friday, June 1, 2012

Sea Fans

With my kiddos away for the week, I've had some time to focus on interior design, both for clients and my own house.  If you recall, I purchased some sea fans a couple of months ago during a girls beach weekend.  I finally took the time to frame them.  Wooo Hooo! 
(I think I should have been taking a photography class instead of framing these.  The wall color looks totally green in this image - they are not green! Rather Grant Beige - not sure why I can't seem to capture it).  
Here's the color:


Sorry to completely digress.  At any rate, I decided to use two of the fans (rather than three) stacked vertically on the smaller wall in my kitchen to the left of the doorway into our den.  I used a dark chocolate linen as the background just to give the fans some definition and create some contrast with the light wall color.  You can see all the detail of the fans with this linen as a backdrop.


It's hard to see from these photos (b/c I stink at taking pictures), but the fans appear to be floating in the thick shadowbox frames.

You can see this detail a bit better in the picture below.

This was a super easy and quick project, and I took pictures every step of the way.  So, I will be sharing a little tutorial with you next this week on how to make some of your very own.  Cheers. M.

PS: any tips on photographing a dark room with zero natural light is much appreciated! 


Friday, May 4, 2012

Happy Weekend

Here's hoping you have a marvelous weekend.  In case you need some help deciding what to spend your precious, coveted, very limited weekend time doing, here are a few clever projects I uncovered this past week.

Tissue Paper Party Pom Poms

Fabulous Loose Braid

Guacamole Bruscetta


Parson's Chair Slipcover

Succulent Wreath

Strawberry Margarita

Hope you can squeeze in some time doing something you enjoy.  M.

Thursday, March 15, 2012

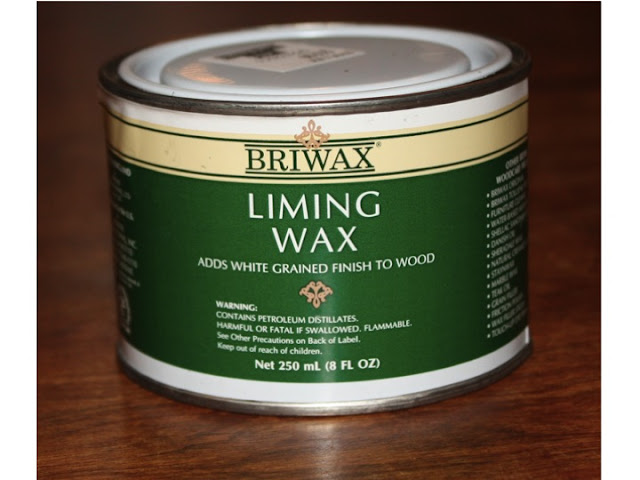
Liming Wax Tutorial

Thank you for all the sweet comments on the dining room before and after post!  It has been so fun reading all of them (especially for my clients who are thrilled with your response).  So, I promised to show you how they limed the table.  Honestly, it's amazing that with a few steps you can take a table from this . . .


To this . . .
source


It does take some elbow grease and attention to detail, but the results are so worth it.  Here's the process.

Step One

In a well ventilated area, sand the entire piece to remove any vanish or lacquer.  This couple wanted some of the original color to show through so they did not sand to bare wood.  I think this added to the patina of the finished piece.  
Also remember, the liming wax will look different depending on the tone of your wood.  So, you'll need to experiment with it a bit.  I actually tried the liming wax on our mantle after staining it and did not like the look, so we went back to a simple stain.  (Here's that post for reference). A simple way to do this is to sand and lime a section that is not visible (aka, underneath the table) before going to all the trouble to do the entire piece. 
Step Two
After sanding, wipe the entire piece down with the tack cloth to ensure there is no residue on the surface.  You want the wax to go on as evenly as possible.
Step Three
Using steel wool, apply the wax to the table in a circular motion.  This will ensure the wax clings to the grain of the wood creating the perfect effect.  The goal is to get this stuff down into the crevasses of the wood.


Remember you need to be liberal with it.


The more you apply the greater the contrast in the grain of the wood.  Notice the cute hubby applying the wax!
Here is a shot of the table after you've applied the liming wax.  You do need to let this sit overnight to dry thoroughly.
Step Four
The next day, apply a clear wax over the entire piece.  This will act as a seal and protect the piece.

Wax On . . . Wax Off . . . (sorry, I couldn't resist).


I should mention since this piece has not be coated with a varnish that the wood is still "open" so you may get water marks, etc. from daily use.  But, honestly, I think this adds to the character of a piece like this.
And the results . . . 


A big thanks to my clients for all these great pictures of the process.  I hope you'll find something to try this technique on in your own home! M.

Tuesday, January 3, 2012

DIY - Painting Shutters

For the past year, our shutters have needed attention.  I'm sure my neighbors were thinking, "We were wondering if you noticed!"  I definitely did - but, as we all know, life just seems to get in the way and the shutters never made it to the list.  Back in November I thought, it's now or never for this year.  So, we got busy.  
When we moved into this house, the shutters were stained, but in need of a refinish.  We hired a guy to do this for us.  It was expensive and took two weeks.  So, this time, I decided we just needed to paint them (the doors were still in great shape, so we just focused on the shutters).  
Since this was going to be a "quick" DIY job, I managed to talk my husband into helping me.  It was really not a difficult job.  In fact, Chris at Sherwin Williams in Homewood, gave me everything we needed and a lesson on how to do it.  

But, quick it was not.  We painted the entire weekend and still did not finish.  We took a break and finished up the following Saturday.  I know we saved some money, but my question is how valuable is your weekend time with your family?  I'm glad we did it, but not sure I would take it on again any time soon!  

For those who think it's worth your time, here's how we did it.

Step 1
Sand any loose chipping paint from the shutters and wipe them down with a clean damp cloth.
Step 2
Tape off the area to prepare for painting.  This step was crucial for us.  In fact, with the first swipe of my brush, it was all over the tape and I thought, "Wow . . . totally worth the extra time."
Step 3
Apply one coat of the proper primer (ask your paint specialist what you'll need).  Since our shutters were previously stained and varnished, we had to start with a primer that sealed them and allowed you to then go back over them with a latex paint.   
This stuff was as thick as fudge sauce and my arm was killing me when we finished.  But, an ibuprofen and glass of wine later, I was fine!
Step 4
Apply your paint color of choice.  Since the primer we had to use could not be tinted the same color as the paint, it took two coats to do the job.  

I really think we needed three, but realized the second Saturday that I would not be squeezing another coat out of the man, so I'm good with two!  Let's just pretend the pumpkins are not in the picture.  K? (After we finished this job, I got so busy with client projects that I did not have time to draft a post about it - thus the pumpkins in the picture.)  But you get the idea!  

I have a few DIY projects on the list for 2012 and will share them with you in the near future.  What about you?  What do you have on the list this year? M.