Caveat: This post grew and grew, so you may want to grab a cup of coffee (or glass of wine, depending on the time of day you are reading this).
You may have noticed, I pin lots of artwork groupings. (if you are not on
Pinterest, click here and get ready to be wowed. Seriously wowed). Why do I pin images? No, I'm not an image hoarder (which I read recently and thought was so funny!) The main reason I pin is simply because a picture is worth a thousand words. If I can show a client what I want them to do in their space, they "get it." If I simply tell them, it's harder to convey my vision to them. I did a post on this years ago entitled
Say What you Mean! My only wish is that Pinterest had images for every single thing I wanted to do. I find I can't always find a picture of what I want to do in a space - then my client has to ride on blind trust!
Well, today, I want to get into the details of Artwork Groupings. To really deconstruct them and think about the different types of groupings and which ones work best given your space and the frames you have on hand. All the examples in this post are from my
Pinterest page.
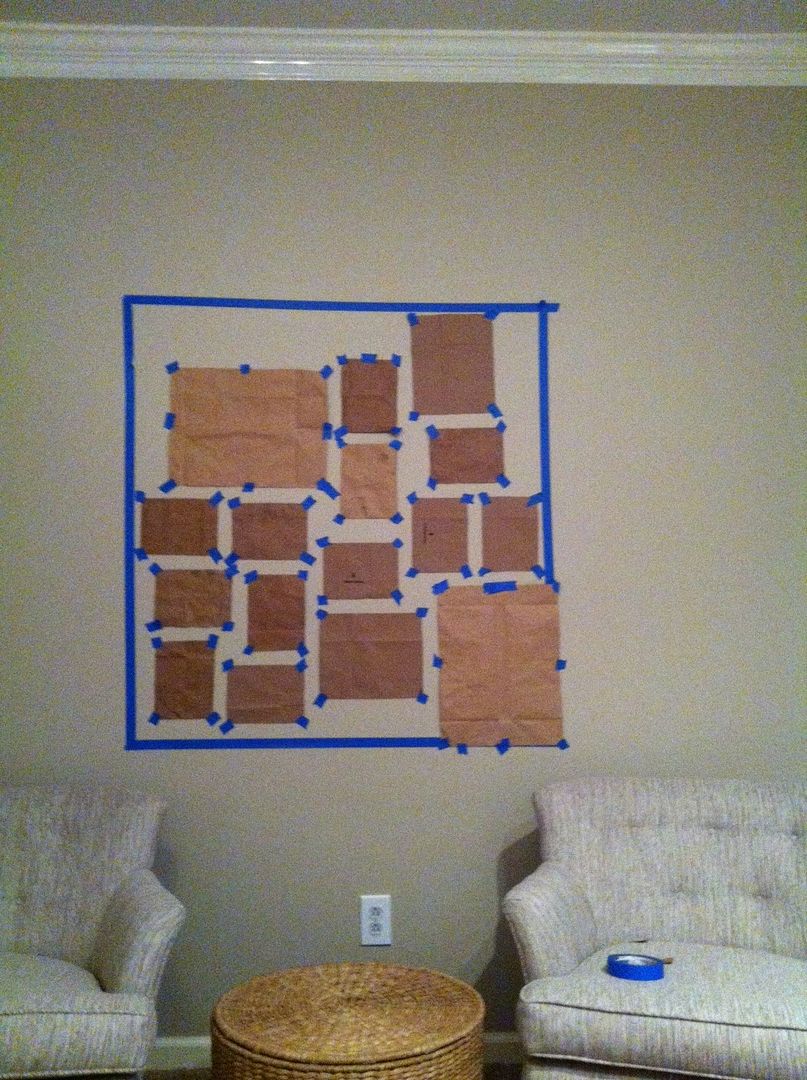
Before we get into this post, let me back up a minute. How did all this come up? Well, last week a client who is in the process of implementing one of my design plans emailed me about a photo wall I recommended she consider. She had purchased her frames and was mapping them out on the wall (which is such a smart way to hang a grouping). She sent me her grouping for guidance.
As an aside, I respond to lots of emails on plan implementation - there is simply no reason for a second consult when I can show the client options via email. So, I took the same frame sizes and came up with this layout.
The only real difference in my layout is I placed the larger frames closer to the center of the grouping. This grounds the grouping and gives it definition (so it doesn't look like you "need" to add more frames). This also shows you there are hundreds of variations on how to create a grouping. No right or wrong way here! Sometimes I'm more draw to the very random groupings while other times I like a tight symmetrical look). It's truly a matter of taste and the look you are trying to achieve.
After some thought, I think groupings fall into four basic categories. These may help you in deciding what type of grouping you want to use in your own home. Again, consider these "types" loosely!
Uniformed Grouping
This grouping is perfect for a framed series of prints. These tends to feel more formal and "read" as one large piece of artwork. I use this trick a lot when I want a ton of impact on a wall but have a small budget to achieve it!
It also works on a secondary wall for some interest.
Now, the grouping below is a bit more tricky than you may initially think - a uniform grouping with both vertical and horizontal images. This type of grouping is for the seasoned picture hanger only!!! I think two things really help to make this work - greater spacing between the images. I usually prefer 1.5" space between my frames. But, with this, you have to use at least 3" so you are not drawing the eye to the vertical/horizontal issue of the images. Also, notice, they have maintained the symmetry by using vertically images on the entire top row and then wrapping these around to the headboard wall. See, there's more to this image than you originally thought!
Uniformed Borders (random on the Inside)
This may be a group you've not really thought about. Notice the outside border of this grouping is a very uniform square, while the spacing between the frames is all over the board. As in the example below, this technique is works great when you have mismatched frames (gold tones, black tone, thick frames, thin frames and completely different sizes). Also, they have used different mediums from paintings and prints to photographs. The one thing that pulls it all together is the outside square border.
One other thing to consider with this style is you can easily hide unsightly outlets, switches and thermostats (to do this, however, just remember to keep the frames and prints a similar tone of color to the switches, etc.). In the example below, they've used the walls as the uniformed border to the grouping. . .
Uniformed Spacing (random on the Outside)
This type of grouping has lots of uses. It can be used on a wall as a focal point, in a stairwell, or to disguise or blend windows that are oddly placed. As mentioned above, I like 1.5" spacing between my frames when I hang artwork in this style.
You can even use this style to "hide" or "blend" a TV into an artwork wall.
Another fabulous example of "blending" the TV by Christine Dovey . . .
This picture brings up another point I want to make. When you do a really large grouping (on in an entire wall), there is simply no way you can keep all the interior edges a uniformed width. So, this is when you allow space for unique items to fill in the grouping.
See the keys in this image? They "fill in" where you have some dead space.
Same for the resin game head and mirrors here?
Again, another example of filling in here (this image is just to small for me to tell what they used to fill in with).
This is also a very clever example of uniformed borders (random on the Outside) - it's actually a brick pattern.
Totally Random
Aaahhh! The easiest kind of grouping - just throw it up there, friend.
Lastly, this one does not fit into any of my categories. It really has attributes that echo all the groups (imagine that!). There is vertical symmetry, almost in sections or columns, but yet, it's still very random (different shapes and frame colors), staggered in feeling. Simply love the look!
My goal here was to bring some light and clarity to groupings. Hopefully, I've not muddied the waters for you! Just remember, "from chaos comes clarity." Nick Hexum
If you need guidance on hanging a series (without assistance), I did a very detailed post on how to hang a grouping. (And you can do it all by yourself, no hubby or bestie needed).